Friday, February 22, 2013

Slow Cooker Beef Short Rib Stroganoff

After a long day on the road working with my education interns I was excited to walk into my house to the smell of onions and beef. I have made more stroganoff recipes that I can count. I started long ago with and easy ground beef recipe. I've also made a gourmet mushroom stroganoff with heavy cream, sherry and Dijon mustard. Chicken stroganoff has even been made in my kitchen. I think this is the best recipe yet, and one of the easiest. The sauce is super simple but very tasty. The short ribs, cooked low and slow for 8 - 10 hours just fall off the bone.

 
Start by placing sliced onions on the bottom of your slow cooker. Put your short ribs on top of the onions. Then sprinkle onion envelope of French onion soup mix over everything. Cook on low for 8 - 10 hours. When you get home after your long day remove the short ribs and put them in a warm oven. Ladle out the drippings from the slow cooker into a fat separator and pour out the beef juices back into the slow cooker. Add cream of mushroom soup, sour cream and fresh mushrooms into the slow cooker and mix together with drippings and onions. Cook on high for another hour. Serve over buttered egg noodles topped with short ribs. Delicious!
 
 
Ingredients
1 large onion, sliced
4 beef short ribs
1 envelop French onion soup mix
2 sprigs fresh thyme
1 can cream of mushroom soup
1 1/2 cup sour cream
8 oz fresh mushrooms, sliced
 
 
Directions
Place sliced onions in the bottom of the slow cooker. Top with short ribs and French onion soup mix and thyme sprigs. Cook on low for 8 - 10 hours.
 
Heat oven to 170 degrees. Remove short ribs from slow cooker and place in oven to keep warm. Ladle drippings in the slow cooker into a fat separator. Pour the beef juices back into slow cooker discarding fat. Add cream of mushroom soup, sour cream and mushrooms to slow cooker. Mix together with onions and beef drippings. Cook on high for another hour.
 
Serve over noodles or rice topped with short ribs and fresh thyme.

Thursday, February 21, 2013

Grilled Chicken, Artichoke and Goat Cheese Pizza

This recipe combines some of my favorite foods, pizza, artichokes, goat cheese, and chicken along with fresh basil and Parmesan cheese. And who doesn't love anything grilled. You can cook this pizza in the oven if you don't have access to a grill, but I highly recommend grilling if you can. It makes the crust crispy and a bit smoky.
I made my own pizza dough, but you can buy dough at the grocery store. Publix has it in the deli. Don't use the canned pizza dough you find in the refrigerated biscuit section. An important trick for making a nice thin crust is to let your dough rest. If you make your own, let it rest for at least and hour after the recommended rise time. If you buy it at the store, let it sit at room temperature for at least an hour before you try to roll it out. If you are going to grill the pizza, put brush each side with a bit of olive oil and put it on some parchment paper. The paper will help you transfer it more easily to the grill.


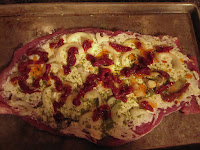
Grill one side of the dough. Flip it over, add your toppings and grill again until the bottom of the crust is done and your toppings are heated through. Now...eat!
Ingredients
 
Pizza Dough:
1 1/2 cups warm water (100 - 110 degrees)
1 pkg rapid-rise active dry yeast
1/2 tsp sugar
4  cups all-purpose flour
3 TB extra-virgin olive oil
2 tsp kosher salt
 
Topping:
1/2 cup ricotta cheese
1/2 cup Parmesan cheese, grated
1/2 small onion, thinly sliced
1 cup canned artichoke hearts, quartered
1 cup cooked chicken, cubed
1/2 cup fresh mushrooms, sliced
4 oz goat cheese, crumbled
1/4 cup fresh basil chopped
 
Directions
 
In the bowl of an electric stand mixer, combine the water, yeast, and sugar. Stir briefly and let stand for 5 minutes or until the top surface has a thin, frothy layer (this indicates that the yeast is active). Add the flour, oil, and salt. Fit the mixer with the dough hook and mix on low speed for about 1 minute or until the dough begins to come together. Increase the speed to medium. Continue to mix until the dough is slightly sticky, smooth, and elastic, about 10 minutes. Form the dough into a ball and place in a lightly oiled bowl. Turn it over to coat all sides and tightly cover the bowl with plastic wrap. Allow the dough to rise in a warm place until it has doubled in size, 1½ to 2 hours. Punch the dough down and let rest for another hour.
 
Prepare the grill for direct cooking over medium heat.
 
Cut the dough into  2 equal pieces. Keep one piece of dough in the freezer to use later. If dough is sticky, sprinkle rolling surface lightly with flour. Roll out one piece of dough to a diameter of 10 - 12 inches. Lightly brush the top with oil. Let the dough sit at room temperature for 5 to 10 minutes.

Lower the temperature of the grill to medium heat. Place the dough on the cooking grate with the paper facing up. Grill over direct medium heat, with the lid closed as much as possible, until the dough is well marked and firm on the underside, 2 to 5 minutes, rotating as needed for even cooking. Peel off and discard the parchment paper. Transfer the crust to a work surface with the grilled sides facing up.

Spread the ricotta evenly over the crusts and then sprinkle with Parmesan. Add the rest of the toppings. Return the pizzas to the grill and cook over direct medium heat, with the lid closed as much as possible, until the toppings are warm and the bottom of the crusts are crisp, 2 to 5 minutes. If the crust is done before the toppings are warm you can transfer to the oven and broil until they heat up. Transfer to a cutting board and cut into wedges. Serve warm.


Wednesday, February 13, 2013

Homemade Burger Buns

It is truly amazing that I am posting a bread recipe. When I was a kid I hated bread. No, really, HATED bread. I especially hated the texture, so much in fact, that for a while I wouldn't eat cake because it reminded me of bread. Brother Don loved bread and, like all brothers, loved annoying the heck out of me. The things he would do with bread cannot be written in a food blog because I'm trying to encourage to cook and eat.


I have learned to love some bread. Not only are these buns pretty easy to make, they are totally delicious and your house will smell amazing while they are baking. Seriously, what's better than the smell of baking bread? Puppy Daddy kept going outside so he could walk back in the house and get a fresh whiff. You really should try these soon!

I found this recipe on several other blogs. They attribute the recipe to King Arthur Flour. The first step is to make your dough. Just dump all the ingredients except one the white of one egg and the sesame seeds into your mixer. Mix until the ingredients come together to form a dough.


Using the dough hook, knead the dough for about 7 minutes. If you don't have a mixer with a dough hook you can knead the dough by hand.

Let the dough rise for 1 and 1/2 hours. It should double in size.


Punch the dough down and turn it onto your counter top. I didn't even need any extra flour to keep the dough from sticking. To make eight good size buns cut the dough in half 4 times.


Shape each piece into a ball. The smoother you make the ball, the prettier your buns will be. You can see what happens if you don't make a smooth ball by checking out my Bacony Bacon Burger picture. The buns still taste great!
 

Put the buns on a greased baking sheet or a baking sheet with parchment paper. Smash the balls down gently with the palm of your hand. Let the buns rise again for 45 minutes.


You can just brush the tops of the buns with melted butter, which is my favorite, but you can also top them with sesame or poppy seeds. To top with seeds whip the egg white until frothy and brush it on top of the buns. Then sprinkle with seeds. You could also add some dried onion flakes and a little garlic salt for Everything buns.

Bake at 375 degrees for 15 - 18 minutes until they are golden brown.

Ingredients
3/4 to 1 cup warm water (start with 3/4 cup and more in small amounts if dough is too dry)
2 tablespoons softened butter
1/4 cup sugar
2 large eggs (1 divided)
3 1/2 cups flour
1 1/4 teaspoons salt
1 tablespoon instant yeast
Sesame seeds or poppy seeds (optional)


Directions

1) Mix and knead all of the dough ingredients — by hand, mixer, or bread machine — to make a soft, smooth dough.
2) Cover the dough, and let it rise for 1 1/2 hours, or until it's nearly doubled in bulk.
3) Gently deflate the dough, and divide it into 8 pieces. Shape each piece into a round ball; flatten to about 3" across. Place the buns on a lightly greased or parchment-lined baking sheet, cover, and let rise for about 45 minutes, until noticeably puffy.
4) Brush the buns with about half of the melted butter.
5) Bake the buns in a preheated 375°F oven for 15 to 18 minutes, until golden. Remove them from the oven, and brush with the remaining melted butter. This will give the buns a satiny, buttery crust. Alternately, brush buns with egg white and sprinkle with sesame or poppy seeds.
6) Cool the buns on a rack.


Tuesday, February 12, 2013

Bacony Bacon Burger


Here at the Whippet Palace we love a good burger. We also love, love, love bacon! In fact we love it so much we have mail ordered it so we can get the good stuff! A few weeks ago Puppy Daddy was watching a show called United States of Bacon. One segment highlighted a restaurant that makes what the call the 50/50 Burger. They make their patties with 50% ground beef and 50% ground bacon. After watching that show, Puppy Daddy was on a mission to make them at home. In fact, he took his lunch hour the next day to go out and buy the grinder attachment for my Kitchen Aid stand mixer. The first time we made them we kept the ratio 50/50. Puppy Daddy loved them, but as much as I adore bacon, it was a bit much for me. This time we made 75/25 burgers and I think they are just perfect  Yes, then bun looks funky, but they are homemade. That recipe is coming soon.

To make these burgers you'll need ground bacon. Use your favorite bacon. We used apple wood smoked. The better the bacon, the better the burger. If you have a meat grinder you can do it at home. You should put the bacon in the freezer for about an hour before grinding it. Bacon has a lot of fat and warm fat doesn't like to be ground up. I wouldn't recommend trying to grind it in a food processor or blender. You'll just get a pasty mess. You could also ask your butcher to grind the bacon for you. You should use a lean ground beef, since the bacon has so much fat.
 
 
Use your favorite method to cook your burger. Top it with your favorite toppings. We kept it simple with cheddar cheese, red onion, lettuce and dill pickles. There were NO leftovers!
 
 
Ingredients for Two Burgers
1/4 pound ground bacon
3/4 pound lean ground beef
salt/pepper
your favorite toppings
 
Directions
Combine bacon and beef. Make two patties. Season both sides of the patties with salt and pepper. Cook according to your favorite method.

Sunday, February 10, 2013

Tuscan Stuffed Pork Tenderloin

Stuffed stuff. The Whippets love it! Come in our house or walk in our yard and you will find stuffed toys everywhere. Hilton loves to carry them around and use them as a pillow. Henderson loves to chomp on the squeaker over and over and over and over and over and over....you get it! Then of course when the toys have been chewed on long enough, they boys find just the tiniest little hole and out comes all the stuffing! Away goes that toy, waiting for a new one to take it's place.


I loved stuffed stuff, too. Especially stuffed food. This recipe looks fancy and difficult, but it's very easy. And delicious, too. Start by butterflying a pork tenderloin and pounding out until it's about 1/2 inch thick.


Next spread on some softened cream cheese, topped with dry pesto sauce mix ( I used Knorr) , sliced onions, sun dried tomatoes and fresh spinach.


Finally, roll up the tenderloin and tie it up so that the yummy filling will stay inside.


Bake at 350 degrees for about 45 minutes. Let sit for 10 minutes before slicing. Then enjoy!
 
Ingredients
1 pork tenderloin
olive oil
4 oz cream cheese, softened
2 TB dry pesto sauce mix
1/4 small onion, thinly sliced
1/3 cup sun dried tomatoes in oil, chopped
3/4 cup fresh spinach leaves
salt/pepper
 
Directions
Preheat oven to 350 degrees. Butterfly pork tenderloin. Pound with a mallet until meat is about 1/2 inch thick. Place on olive oil greased baking sheet. Spread  cream cheese on tenderloin. Sprinkle with pesto sauce mix. Top with onion, sun dried tomatoes and spinach. Roll tenderloin tightly, making sure ingredients stay inside. Tie roll together with kitchen twine or seal edges with toothpicks. Season tenderloin with salt and pepper. Bake for 45 minutes. Let sit for 10 minutes before slicing.


Tuesday, February 5, 2013

Perfect Roasted Chicken and Potatoes

I'm not kidding, I think this is the best roast chicken I've ever made. The skin is crispy. The meat is tender and moist. The potatoes soak up all the flavors from the roasting chicken. Delicious! Not to mention lots of left over chicken for other meals.


If you have the time, let the chicken sit in the fridge with a good coating of salt inside and out for an hour, or up to one day. It's a bit like brining. The salt has time to penetrate the chicken for extra flavor. The other trick is to cook the chicken over the potatoes and some onions. The drippings from the chicken will totally flavor the veggies on the bottom. If you like carrots, you could add those, too.

You should try this very soon!

Ingredients
1 whole chicken
5 Yukon Gold potatoes
1 small onion
1 TB fresh rosemary, chopped
1 TB fresh thyme, chopped
2 cloves garlic, pressed or grated
2 TB butter, melted
salt/pepper

Directions
Remove packet of giblets from inside chicken. Pat dry. If you have time sprinkle the chicken inside and out with salt, and let it sit in the refrigerator for 1 hour to one day. Before roasting, bring chicken to room temperature.Preheat oven to 425 degrees. Slice potatoes and onions. Place in the bottom of a roasting pan. Season with salt and pepper. Top the potatoes and onions with a baking rack. Put salt and pepper all over and inside the chicken, and put it on the baking rack. Mix herbs and garlic in the melted butter. Brush half of the butter mixture on the chicken. Place it in the oven for 1 hour, until the juices from the thigh of the chicken run clear. Half way through baking time brush chicken with the remaining melted butter mixture.

Monday, February 4, 2013

Baked Sweet and Spicy Asian Wings

Every year Puppy Daddy and I host an extremely exclusive Super Bowl party. So exclusive, in fact, the only guests are the Whippets, Puppy Daddy and me. Thought the guest list is small, we make a big deal out of the food. Over the years we have many different themes from pub food, to Mexican to last year's Super Fry when everything we ate was made in the deep fryer. I know, super unhealthy, but it was so yummy! This year I decided on an Asian theme. The menu included Crab Rangoon, Pot Stickers and Asian Wings. I put in many hours prepping food ahead, but unfortunately 1 of the three dishes did not turn out so great, the Pot Stickers. Although the filling was delicious, the dough for the dumplings was hard to work with and as much as I tried to get it nice and thin it turned out thick and sticky when cooked. I do think the filling would be great in lettuce wraps and I made a killer dipping sauce, so be looking for that recipe soon!

The wings, however, were fabulous. I am a huge chicken wing fan. Usually I prefer hot Buffalo wings with lots of blue cheese dressing, but these wings my be my new favorite.They are both sweet and spicy with a definite Asian taste. To cook the wings I used a method by Alton Brown, oen of my favorite Food Network personalities. Every method of his that I have tried has produced the best possible result. These baked wings come out really crispy like fried wings. In fact I like them even better than fried wings. To make the wings you steam them for 10 minutes and then let them sit uncovered in the fridge for 1 hour. Then bake them for 40 minutes, turning them 1/2 way through the cooking time.

Next it's time for the sauce. I did some research on Asian wing sauces and found that many of them called for plum jelly. Since I try to avoid sugar in my diet, I used sugar free blackberry jam...FABULOUS! Just warm the jam on the stove with some soy sauce, rice wine vinegar, grated ginger, grated garlic, minced onion and plenty of crushed red pepper flakes. When the wings finish baking pour the sauce over them and bake for another 10 minutes.

I served the wings with a dipping sauce made from ranch dressing mixed with Asian chili sauce with garlic. It was the perfect accompaniment for the sweet wings!

Ingredients

Wings
20 - 24 chicken wing drummettes
water

Wing Sauce
1 cup blackberry jam or plum jam
1/3 cup soy sauce
1/3 cup rice wine vinegar
1 TB grated garlic
1 TB grated ginger
1 - 2 TB crushed red pepper flake

Dipping Sauce
1 cup Capital Hill Ranch Dressing or your favorite ranch dressing
2 TB Asian chili sauce with garlic

Directions
Place a 6-quart saucepan with a steamer basket and 1-inch of water in the bottom, over high heat, cover and bring to a boil.

Remove the tips of the wings and discard or save for making stock. Using kitchen shears, or a knife, separate the wings at the joint. Place the wings into the steamer basket, cover, reduce the heat to medium and steam for 10 minutes. Remove the wings from the basket and carefully pat dry. Lay the wings out on a cooling rack set in a half sheet pan lined with paper towels and place in the refrigerator for 1 hour.

Preheat the oven to 425 degrees F.

Replace the paper towels with aluminum foil. Roast on the middle rack of the oven for 20 minutes. Turn the wings over and cook another 20 minutes or until meat is cooked through and the skin is golden brown.

While the chicken is cooking prepare the sauce. Put all ingredients in a sauce pan. Simmer for 5 - 10 minutes. When wings come out of the oven, pour sauce over them. Return to the oven for 10 minutes.

To make dipping sauce just combine ingredients in a small bowl.

Friday, February 1, 2013

Chicken Breast with Creamy Herbed Mushroom Sauce

This blog really is about the food I really cook for meals that we really eat. The photos are taken while I'm really cooking and just before we really dig in to eat. That's why I haven't blogged for a week. Puppy Daddy was out of town and I spent the week eating up all the left overs in the fridge. I was so excited to make this dish for his first dinner at home last night.


This is pretty simple and the creamy mushroom sauce is delicious both on the chicken and on buttered egg noodles. Start by pounding out your chicken breast to about 1/2 inch thick. You can just saute the breast by itself in some butter, but I really like it with a thin coat of breading on it. The flour also helps thicken up the sauce. Just cook the chicken breast breaded or not in butter. When it is cooked through and both sides are browned put it in an oven proof dish and keep warm in the oven.

Next make your sauce by sauteing sliced mushrooms and  chopped red onion. (You may need to add a bit more butter.) When the mushrooms and onions are soft, deglaze your pan with  dry sherry, scraping up the brown bits on the bottom of the pan. Next add  chicken stock or broth,  heavy cream, a few sprigs of thyme (The leaves will come off as it cooks. You just remove the stems before serving.) and dried tarragon. Cook  until the sauce starts to thicken. Spoon over your chicken and eat!


Ingredients
2 boneless, skinless chicken breasts
salt/pepper
1/2 cup flour
8 oz sliced mushrooms
2 - 4 TB butter
1/4 cup chopped red onions
2 TB dry sherry
1 cup chicken stock or chicken broth
1/2 cup heavy cream
3-4 sprigs of fresh thyme
1 TB dried tarragon

Directions
Pound chicken breast until about 1/2 thick. Season with salt and pepper. Dredge lightly in flour. Cook in a medium high skillet with 2 TB of butter until browned on both sides and cooked through. Remove to an oven safe dish and keep warm in a 200 degree oven. Saute mushrooms and onions is skillet adding butter if necessary. Cook over medium high heat until soft and browned. Deglaze skillet with sherry, scraping up the brown bits on the bottom of the pan. Add stock, cream, thyme and tarragon. Cook until it reaches desired thickness. Serve over chicken breast.